Transaction Management
The Transaction Management feature allows you to view a list of all transactions that have taken place in WeighComp, both pending and previously approved. The Transaction Management page displays detailed information about every transaction, such as its type (i.e., delivery or pickup), its vendor, and its product (for example, rolled wheat). Additionally, you can quickly enter new transactions or approve pending transactions directly on the page.
You can find this feature under the WeighComp menu.
Data entry for spot load transactions is done via the WeighComp app by the truck driver, whether the transaction is inbound (a delivery) or outbound (a pickup). Additionally, authorized users can enter transactions directly on WeighComp in VAS PULSE Platform. However, the WeighComp app provides a step-by-step interface so that truck drivers can easily record deliveries and pickups of feed inventory. Once a transaction is completed in the WeighComp app, the data is sent to PULSE.
The relationship between WeighComp, FeedWatch (on-premise), and PULSE for transaction management is shown in the
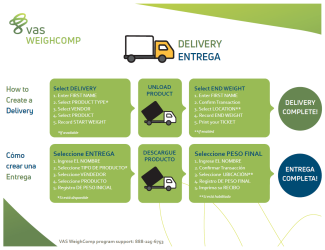
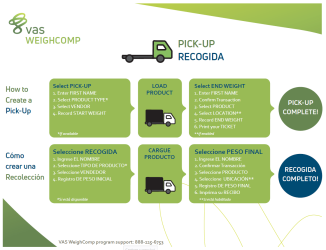
For example, once a truck arrives at the feed scale for a delivery, the driver inputs basic information about the transaction (name, product type, vendor, etc.) into the app, records the full and empty weights for the load, and then finalizes the transaction. The data for that transaction is transferred to PULSE via a cloud-based connection. At that point, the driver is done and is free to move on to other work.
The diagrams below illustrate the app workflow. These diagrams are designed so that you can print and post them for easy reference near the WeighComp tablet on‑site at your dairy.
Download and print the PDF version:
The main job of WeighComp in PULSE is to store the transactions created in the WeighComp app. You can then view these transactions in PULSE, as well as manage and approve them.
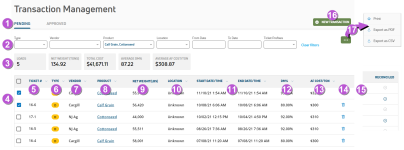
- Pending/Approved: Click the Pending or Approved tab to choose either type of transactions to display in the page.
- Pending transactions are those that have been completed through WeighComp but have not yet been reviewed and approved.
- Approved transactions are those that have been reviewed and accepted.
- Display filters: Filter the list by Type, Vendor, Product, etc.
- Transaction Summary: Shows a complete summary of all your transactions, including total amounts for loads, net weight, and cost, as well as the average percentage of dry matter
 The dry weight of an ingredient with no mositure. and average cost per ton.
- Selection checkboxes: Check boxes
 to select multiple transactions for bulk update or approval.
- Ticket: The number of the ticket printed when the transaction was completed in the WeighComp app or manually entered in PULSE. The WeighComp app automatically assigns a new ticket number to the transaction using the following structure:
- Integration Zone
 The term "Zone" represents different dairy locations. Platform Zones may be different physical dairy locations (for example, multiple locations across the state or country) or different user-defined locations within a single dairy site (for example, Pens 1-100 are Zone 1, Pens 101-200 are Zone 2, etc.). Number: The identifier for the WeighComp tablet that was used to create the ticket.
 - Ticket Number: The unique, sequential number that the WeighComp app generates every time you create a new ticket.
- Integration Zone
- Type: Shows whether the transaction is a delivery
 or a pick-up
  .
. - Vendor: The name of the vendor associated with the transaction (from FeedWatch (on-premise)).
- Product: The product name associated with the transaction. Clicking on a product brings up its details, including what recipes it's used in and location information.
- Net Weight: The new weight of the product associated with the transaction.
- Location: The location on the farm where the transaction took place.
- Start/End Date/Time: The date and time that the transaction began and ended.
- DM%
 Dry Matter Percentage: The percentage of dry matter for the transaction.
 - AF
 As fed Cost/Ton
 As‑fed cost per ton: The cost of the product involved in the transaction.
 - Delete icon: Click the delete icon
 to delete the transaction. See Delete a Pending Transaction to learn more.
 - Reconciled: A check-mark
 in this column indicates that this transaction has been reviewed. This column only appears on the Approved tab.
 - New Transaction: Click the New Transaction button
 at the upper right corner of the screen to add a new transaction to your records directly from PULSE. See Add a New Transaction to learn more.
 - Options button: Click the Options button
 at the upper right corner of the screen to print or export your transaction data. See Print and Export WeighComp Data to learn more.
You can easily add a new WeighComp transaction to your records on PULSE. Click the New Transaction button  at the upper right corner of the screen to open a side panel where you can create a new transaction.
Follow the guidelines below when you enter information for new transactions:
-
You can manually enter a ticket number for the transaction. If you prefer, you can leave the ticket number blank.
- The fields in this side panel are the same as those shown in the Transactions list. Refer to View WeighComp Transactions for a description for each of these fields.
- Remember to mark the transaction as a delivery or a pickup transaction.
- You can manually enter information for the DM% or AF Cost/Ton fields or you can click Import DM% and Cost from FeedWatch to directly import the percentage of dry matter or the cost of the product from FeedWatch. See Import Dry Matter and Cost Data to learn more.
When you're finished, click Save Draft. The system displays a message at the bottom of the page stating that your new transaction has been added.
The list now displays your new transaction, which you can now edit or approve. See Edit and Approve Transactions to learn more.
Click on any pending transaction to edit its details in a side panel. You can also edit the start and end weights of a pending transaction and approve pending transactions from the side panel.
When editing a pending transaction, you can use the Save Draft button to save your changes before actually approving the transaction. A new transaction can't be approved until all the fields (except Field ID![]() Identifier and Truck ID) are completed. To approve the transaction, click Approve. Approved transactions are considered done and cannot be edited.
Identifier and Truck ID) are completed. To approve the transaction, click Approve. Approved transactions are considered done and cannot be edited.
- Click on a pending transaction to display its side panel.
- In the side panel, click in the field(s) of the detail(s) to change and enter the new information.
- When you're finished editing the information, click Save Draft.
The system displays a message at the bottom of the page indicating that your changes have been saved.
The start and end weights originally received by the WeighComp app for pending transactions can be manually edited:
- Click on a pending transaction to display its side panel.
- In the side panel, click the edit icon
 for the start weight or end weight.
 - Enter a new start or end weight value.
- When you're finished editing the information, click Save Draft
The system displays a message at the bottom of the page indicating that your changes have been saved.
You can import the dry matter percentage (DM%) and cost data for a pending transaction directly from FeedWatch. Doing so provides the most current data available for those values (which can be viewed from the Ingredients page). Dry matter and cost data can be added to individual transactions, or to multiple transactions using the bulk edit feature.
- Click on a pending transaction to display its side panel.
- If necessary, assign Product and Location values to the transaction.
- Click Import DM% and Cost from FeedWatch.
The newly imported values appear in the DM% and AF Cost/Ton fields.
- Click Save Draft.
You can edit/update multiple pending transactions at the same time, provided that they all have the same product (for example, Corn Silage). (Remember, you can filter the transaction list using the Product filter at the top of the list.)
To update multiple transactions:
- Check the boxes for the transactions you want to update.
You can check boxes for individual transactions, or check the topmost box to select all transactions. A blue indicator bar appears near the top of the grid showing the number of transactions selected as well as an edit icon.
- Click the edit icon
 .
.The system displays showing the fields you can update.
- Edit the applicable fields as desired, then click Save.
A green indicator bar appears at the bottom of the screen stating how many transactions have been updated, and the data for the applicable transactions updates in the transaction list.
You can approve multiple pending transactions at the same time, provided that the transactions selected contain all the data needed for approval. To do so:
- Check the boxes for the transactions you want to approve, or check the topmost box to select all transactions.
- In the blue indicator bar that appears, click the approve icon
 .
.The system displays a window indicating the number of pending transactions to approve and asking you to confirm the approval process.
- Click Confirm.
The system displays a new window summarizing the numbers of the transactions that were approved and/or failed the approval process. The window also shows product and timestamp information for the transactions that failed to be approved.
Reconciling a transaction is a way to note that an approved transaction has been reviewed in PULSE. This is an optional step to electronically verify that the desired loads for a product were actually brought to (or picked up from) the dairy.
-
Transactions that have been reconciled are displayed in the Reconciled column of the Approved tab.
- In the Approved tab, check the boxes for the transactions you want to reconcile.
- In the blue indicator bar that appears, click Reconcile.


